
Row-level security in Power BI
To ensure that data in Power BI reports do not fall into the wrong hands, it is possible to apply Row-Level Security (RLS) to any report within a workspace. This ensures that for each recipient of the report a difference can be made in what data they can see. It is important that the setup is done accurately and that the members of a workspace are assigned the right role to prevent them from seeing too much information, for example. This RLS layout of the online workspaces in Power BI has changed in the last few months. In this blog, we explain what to pay attention to when setting up a new workspace and setting up the renewed RLS in Power BI.
RLS in Power BI in practice
A good example of the application of RLS is in a multi-branch store chain, where each branch manager is responsible for his own store. Each branch manager is only allowed to see the figures of his own store. Because of RLS it is no longer necessary to create a separate report for each store manager.
RLS for published dashboards is set up in Power BI Desktop under the Modeling tab. For each role, the report must indicate which tables are to be filtered. Different columns within a table can be filtered, for example on the Place column. Below is an example of the role for a branch manager in Rotterdam.
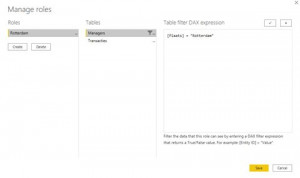
Apply filter storeID
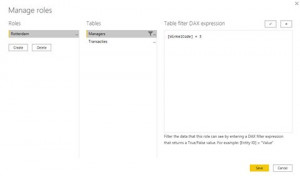
By filtering the region of the store on Rotterdam, the transaction table is also filtered on data from Rotterdam, provided a relationship is established between these two tables. When there are several branches in Rotterdam, managers from this city will be able to view each other’s figures in the current set up. In some cases, this may not be desirable. To prevent this, it is possible in this dataset to filter one level deeper through a unique field per store. In our example this is StoreID. As long as each StoreID in our dataset is unique, each manager will only be able to see data of his own store. A separate role should be created for each manager.
Once the report is published, the email addresses can be added to the corresponding role in the Power BI Service. It is possible to link 1 email address to different roles. This situation can occur when for example a manager (temporarily) takes over another branch. An e-mail address can be deleted at any time, which means that the rights to view the data expire immediately for the person in question. It is therefore important that a designated person maintains and updates the RLS rights.
Roles in new workspaces
As previously mentioned, the functionalities of workspaces have recently been renewed by Microsoft. Within the old workspaces, you could only assign the roles Member or Administrator to a person. In the new situation there are four different roles:
- Viewer is the read-only role. With this role, it is not possible to edit or change reports. Attention! When a report uses RLS, all users must get at least the role of viewer, otherwise the RLS will not work.
- Contributor is the role assigned to persons who need to be able to publish, edit, update and delete reports. This is a role for the developers in the team for example. However, the contributor does not have the right to share reports or add users to the workspaces.
- In addition to publishing, editing and updating, a Member can also share the reports with others. They also have the rights to add users with the same or lower roles (Viewer and Contributer).
- An Admin has all the functionalities that the lower roles have, but in addition administrators can also remove workspaces and make other people administrator. Administrators are also allowed to remove people from the workspaces.
Creating new workspaces
Besides the new roles, creating a workspace is also different. When creating an old workspace, an Office 365 group was always created. With the introduction of the new workspaces, a workspace is created without an Office 365 group. The workspaces only exist in the Power BI environment. Because of this, the workspaces do not automatically appear in for example Teams. In the past, this was experienced as confusing by many users.
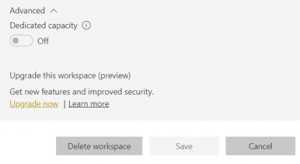
It is possible to convert an existing workspace to a new workspace. This is easy to change under the advanced settings. This option can be found in the workspace settings.
In the old workspaces, all members can be seen separately. When converting to the new workspace, these members are clustered into a group with the name of the workspace. You can see which members are in the group on the Office 356 site. We recommend converting old workspaces to new workspaces so you can assign more specific roles to people.
This concludes RLS in Power BI. If you want to know more about RLS or Power BI in general, please contact Paul!
Latest Blog Posts

Artificial Intelligence is ready!
In this interview, Jonathan Aardema talks with Prof. Eric Postma (professor of Cognitive Science and Artificial Intelligence at the University of Tilburg) about the why, how, and what of artificial intelligence applications. What do we see in practice, and what does science say about it?

Visiting London for the Tableau Partner Executive Kick-Off 2020
Every year Tableau invites its most valuable partners to kick off the new year together. The theme for this year was Accelerate, so let’s get right to the point. This exciting event was focused on three main areas.

Mastering DAX
Keeping your skills up to date is crucial when you work with the newest technology. At Rockfeather, we challenge each other to be the best version of yourself. That’s why I attended the mastering DAX course. DAX (Data Analysis Expressions) is a formula expression language. Next to Power BI, DAX is applied in Excel Power Pivot and tabular models in SQL Server. Learn it once, use it tomorrow.